

If you’ve taken apart your console and tombstone to install a stereo, you already know how to do about 90% of this install. It’s really easy; however, it may seem daunting if you’ve never done it before. I’m erring to the side of over-documenting, so it may seem more involved than it really is.
Please note: The new version (v2) of this product has eliminated the backing plate and replaced it with 3D printed surrounds for the nuts.
These surrounds, aka wingnuts, make it easier to assemble than fiddling with a backing plate. Other than that, the instructions are exactly the same.
Here’s a picture of the parts that replace the backing plate. You can see that the switch nut is embedded into a 3D printed part that makes tightening it easier:

Here’s what the back of the version 2 switches look like with the wing nuts instead of the backing plate:

Original Instructions
The pictures below are from an NA8, because…well, I have an NA8. The install is pretty much exactly the same for the NA6 and NA8. Before we start tearing our interior apart, let’s take a look at how the switches are constructed.
It’s not an overly complex piece by any stretch of the imagination. The gap between the front and back plate is where the tombstone lives. Each button has a connector, H = Hazard Button / P = headlight Pop-up. Those connectors are wired to a harness that’s plug-and-play with the OEM piece.

Center Console Removal
So let’s get going on this install. Pull the hand brake and put the car in neutral. Then remove the shift knob by unscrewing it. If your shift knob hasn’t been removed in a while (or ever,) you might need to give it some torque. I’ve never heard of one breaking. Your mileage may vary. Remove the five screws as indicated by the orange arrows in the image below. Remove the console by lifting the front a little then working the locking armrest section around the gas and trunk levers.

My 1996 Miata has a ‘courtesy light’ that needs to be unplugged before you pull the console all the way out. I’m not sure if every model does. You can see the white LED peeking through a slot just right of the shift boot in the picture above. While we’re at it, there’s another screw that needs to be removed. Here’s the scene below.

Tombstone Removal
Technically this step started when you removed that last screw. It holds the base of the tombstone in. Next, we need to remove the eyeball vents. It’s time for a new camera angle.
There are a few different approaches to eyeball vent removal. I prefer the wire method. Take a short length of speaker wire, electrical wire, wire coat hanger, or whatever. Bend it to make a ‘hook’ a few inches long…or a few more centimeters long. You want enough length on the short side that you’ll be able to grab it.
Insert your hook. Catch an eyeball. One polite, yet firm, tug is all it takes. Well, two technically since you have two vents to remove.


Small tangent: Wonder why this tombstone has switch guards? It once lived in the top-notch build, ‘Warbird,’ and was sporting some Revlimiter retro switches until I needed to use it for this guide. It’s a piece of Miata royalty in my humble opinion.
With the two vents removed, you now have access to the two remaining screws that hold the tombstone. The picture below shows the angle you’ll take with your screwdriver. For the other vent, it’s a mirror image of this angle. Be careful to not drop the screws as you’re removing them or replacing them. There’s a good chance the clink and clank as they fall into the abyss will be the last anyone hears of them.
Pro tip: stick an index card or something in there to catch the screws if you drop them. They’ll slide out happy like a toddler at a playground. I didn’t take a picture of that tip because I literally just thought of it. I haven’t tested the idea yet.

You’ve removed all the screws, but you have one tether left. The stock button assembly is connected to the harness. Pull the tombstone a couple of inches away from the dashboard, but don’t put too much tension on the wires. Squeeze the center tab on the harness pictured below, and pull the tombstone away.

You’ve now officially removed your own tombstone. Maybe there’s a life lesson in that. Probably not. At this point, two screws are all that stands between you and your new buttons. Remove those two screws and you’re ready to install your buttons…almost.

Optional Step: See the little tab on the back of the tombstone in the picture below. Clipping that off with side cutters, or snapping it off with pliers, or going way overboard and cutting it off with a dremel will make lining up your button plate much easier. Removing it should have almost no effect on re-installing the OEM buttons if you ever want to. But again, completely optional.

Installing the Modern Hazard Switch
Mounting to the Tombstone
Two images should make it clear how the switch mounts to the tombstone.


Some things to note. The switch comes pre-assembled in the right orientation. Hazard button on the top. Pop-up button on the bottom. If you completely disassemble the unit, remember that the front plate is symmetrical for the NA6 version, but the NA8’s front plate is longer on the bottom (below the pop-up button). For both versions, the back plate is longer on the bottom.
Unscrew the two nuts on the back of the buttons, and pull the back plate off. With the button shafts still through the front plate, hold the plate and lower the button shafts through the button holes in the tombstone. It should looks something like the picture below; however, the buttons and plate will be loose, so don’t worry about getting everything lined up perfectly just yet.

Turn the tombstone over, slip on the back plate, then start screwing on the nuts. Alternate between the top and bottom but so that you don’t over-tighten one and leave the other loose.
As the nuts tighten down the plate, you’ll need to turn the tombstone over, line up the plate and buttons.
Tighten a little more, adjust a little more. It’s hard to describe exactly what ‘tight enough’ feels like. If they’re too loose, the buttons and plate will move around freely. Over-tightening feels like the plates are firmly in place, but the plates will suddenly snap out of position. It should look something like this from behind.
Note that the button terminals aren’t aligned, even though the symbols on the front are in the correct orientation, and that each button has a “lonely terminal” – a terminal all by itself on the back of the button.

Connecting the Harnesses
As shown in the picture of the assembly, the button harnesses will be labeled, H = Hazard Button / P = headlight Pop-up.
If for some reason the label has rubbed off, you can tell the difference by noting the number of terminals / wires in the harness. In both harnesses one row of terminal positions is empty. For the other row, the harness for the pop-up button is full row, whereas the harness for the hazard button only has 2 of 3 terminals. If that’s confusing, hopefully the picture below makes more sense.

Also note that there’s an easy way to make sure you plug the harness into the button in the right orientation. For both harnesses, the lonely terminal (the single terminal on the empty row side) plugs into the lonely terminal on the button. The red wire connected to the button harnesses is always connected to the lonely terminal.
Plug the button harnesses into the buttons. Plug the rectangular harness into the harness in the dashboard.

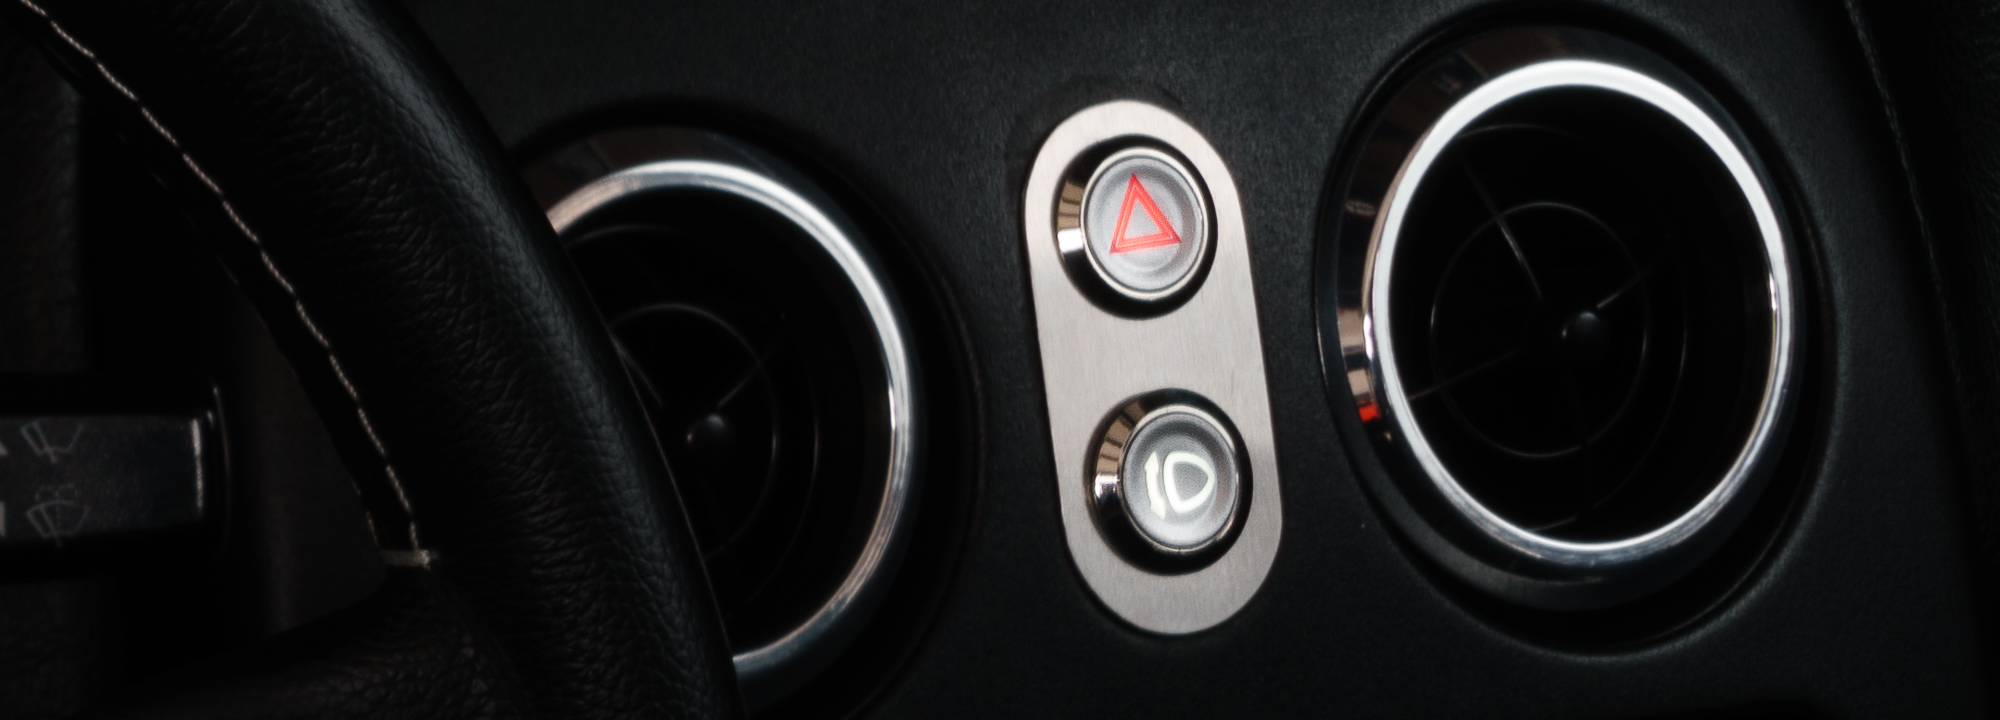
Congrats! Your buttons should now work!! Test them by turning on your lights. The hazard symbol should shine red. The pop-up symbol should shine white. Push each button to make sure they do what they should (assuming they did before).
Reassembly
Reverse the order of disassembly and put everything back together. You have:
- 3 screws for the tombstone
- 2 eyeball vents
- Reconnect the courtesy light harness (if so equipped)
- 5 console screws
- 1 shift knob
Wrapping up
Enjoy your new buttons! I’m proud that you like my product well enough to spend your hard earned money on it. 🙂 Please email me at brian@garagebrisco.com if you have any issues with the install or with the product. I am happy to help!!
Thanks!
Brian